CLICK HERE TO WATCH A STRIPE INSTALLATION VIDEO.
CLICK HERE TO WATCH ANOTHER STRIPE INSTALLATION VIDEO.
On all kits the car should be out of the wind and the temperature should be at least 50 degrees. The warmer it is the better. Keep the decals away from dirt and sand. Clean the application area very well with alcohol to remove dirt & wax. Only use 1/4 teaspoon (or 4 drops) of soap per 16-20 ounces of water. If you can't find clear liquid Joy then most any liquid dishwashing soap will work. Apply one section at a time and keep the stripes you are not working with away from your work area so that they do not get wet. Bubbles will come out over time in the sun or can be popped with a fine needle. Take your time.
|
RALLY STRIPE INSTALLATION - To install our stripe kits first take
a pair of scissors and cut the stripes into the lengths you will need for
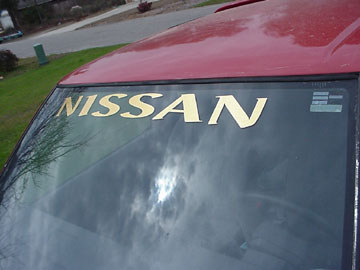
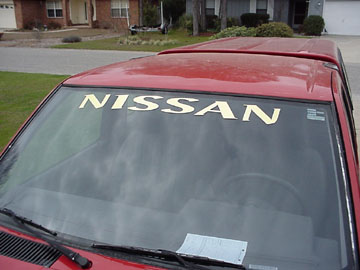
the hood, roof and trunk of your car. I cut each piece a little longer than I need and then either fold it under or trim it once the stripe is installed. If your kit contains precut pieces you will not need to cut these. Remove any emblems that may get in the way of the stripe. (replace them after the stripes are applied) Clean the application area with rubbing alcohol. After the car is clean, mix in a spray bottle 20 ounces of water, 1/4 teaspoon of unscented clear liquid JOY and 1/2 teaspoon of Isopropyl Alcohol. (if you do cannot get clear liquid joy any dishwashing liquid will work) I normally find the center of the car and then take a roll of masking tape and run it from the front to the back of the car. If I want the stripes to be an inch apart I use one inch wide tape. If I want them two inches apart I use two inch tape and so on. Once I have marked where the stripes will go I spray the car with soapy water and then I peel off the backing and spray the adhesive side of the first stripe with the soapy water as well. (TIP - lay the stripe down shiny side down and peel the paper backing off of the stripe, not the stripe off of the paper backing. Then spray the sticky side which will be facing up with soapy water and then handle the stripe. This will lessen the chance of you stretching the vinyl as you peel it off the backing.) Position the stripe where you want it and slide it into place. For longer sections is it nice to have a second person help out. On precut pieces I normally slide them into proper position and squeegee from the center forward and back so that I do not reposition the decal. As long as the stripe and the car are wet with the soapy water you can work with the stripe. Keep the stripes you are not working with DRY. Once the stripe is where you want it you simply squeegee it on. Spray a little soapy water on the stripe to allow the squeegee to glide over the stripe without scratching it. (wrapping the squeegee in a soft cloth will also protect the stripe from scratches) Repeat this process on all stripes and then trim any excess vinyl away with an exacto knife or razor blade. VINYL VISOR INSTALLATION - To install the vinyl visor strip clean the windshield with alcohol and then mix in a spray bottle 20 ounces of water, 1/4 teaspoon of unscented clear liquid JOYand 1/2 teaspoon of Isopropyl Alcohol. After peeling away the wax backing, spray both the windshield and the back of the vinyl strip with the soapy water. Slide the strip around until it is level and squeegee out any air bubbles with the free squeegee supplied with the kit. Then simply trim around the top with an exacto knife or razor blade. These can be installed in just a few minutes. DECAL KIT INSTALLATION - To install our decal kits first take a pair of scissors and cut the stripes and logos into separate pieces. Then clean the application area with alcohol. After the car is clean, mix in a spray bottle 20 ounces of water, 1/4 teaspoon of unscented clear liquid JOYand 1/2 teaspoon of Isopropyl Alcohol. After peeling away the wax backing, spray both the surface of the vehicle and the back of the vinyl strip with the soapy water. Then slide the decal into position and squeegee out any air bubbles with the free squeegee supplied with the kit. Use a razor blade or exacto knife to cut the vinyl at door edges and then smooth it around the edges with your finger. Wait until the decal is completely dry and then slowly peel away the transfer tape (looks like masking tape). If the transfer tape wants to pull off the decal, resqueegee the decal and wait longer. Rally stripes that are not transfer taped are done the same way except there is no transfer tape to remove. For kits that include a vinyl visor and windshield letters follow the instructions above for these items. ROCKER PANEL STRIPE INSTALLATION - To install our rocker panel stripe kits first clean the application area with rubbing alcohol and then take a pair of scissors and cut the stripes into the lengths you will need for in front of the door, the door, and behind the door. Measure carefully before cutting the stripe into separate pieces. Now mix in a spray bottle 20 ounces of water, 1/4 teaspoon of unscented clear liquid JOYand 1/2 teaspoon of Isopropyl Alcohol. (if you do cannot get clear liquid joy any dishwashing liquid will work) Spray the car with soapy water and then peel off the backing and spray the adhesive side of the first stripe with the soapy water as well. Position the stripe where you want it and slide it into place. As long as the stripe and the car are wet with the soapy water you can work with the stripe. Once the stripe is dry it is permanent until you want to remove it. Once the stripe is where you want it you simply squeegee it on. Spray a little soapy water on the stripe to allow the squeegee to glide over the stripe without scratching it. (wrapping the squeegee in a soft cloth will also protect the stripe from scratches) Repeat this process on all stripes and then trim any excess vinyl away with an exacto knife or razor blade. Once the soapy water has evaporated and the stripe is dry you can gently peel away the transfer tape. Pull slowly to avoid pulling up the vinyl. INSTALLATION INSTRUCTIONS - Windshield Decals (also applicable to Most Jeep Hood Lettering Kits) Installing your custom windshield decal is simple if you follow these step by step instructions. Before installing any graphics kit you should clean your car and move it to a shaded area where there is no wind. Step 1 - Clean the application area and center the decal on your vehicle's windshield with ALCOHOL. (IF YOU DO NOT CLEAN THE WINDSHIELD VIGOROUSLY WITH ALCOHOL THE LETTERS COULD COME OFF, ESPECIALLY IF YOU HAVE EVER PUT RAINEX ON YOUR WINDSHIELD !) Put small pieces of tape on the top corners to hold it in place. 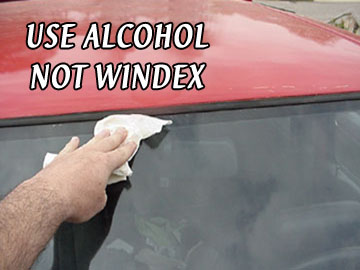
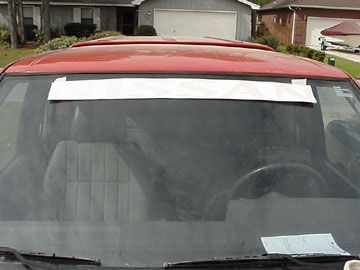
Step 2 - Apply a piece of masking tape across the top of the decal. 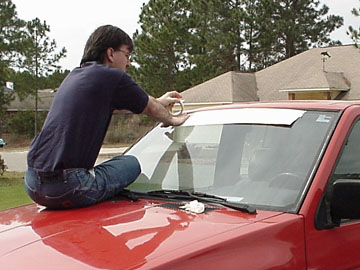
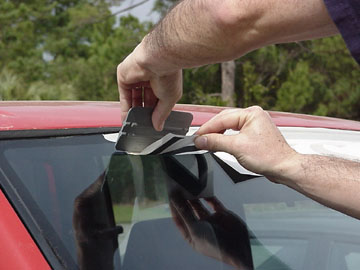
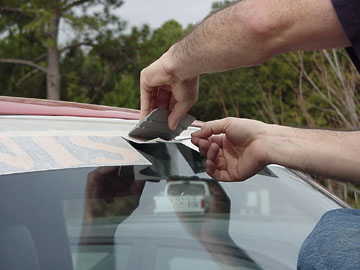
Step 3 - Take a pair of scissors and cut between each letter. (Either all at one time or one by one as you apply) 
Step 4 - Fold each letter up, peel off the backing and squeegee the letter on starting at the top and working towards the bottom. (TO AVOID WRINKLES HOLD THE LETTER AWAY FROM THE GLASS WHILE SQUEEGEEING IT DOWN) Repeat this action for all of the letters. 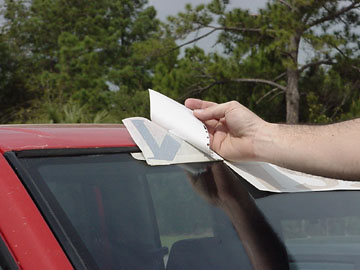
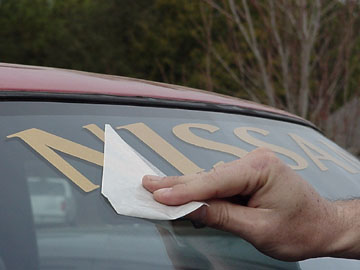
Step 5 - Peel off the transfer tape and you are done. 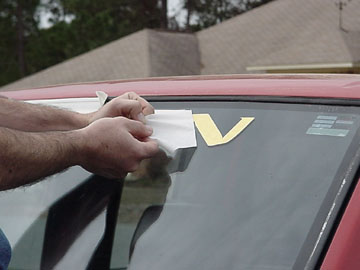
|
FOR MORE INSTRUCTIONS ON INSTALLING ADHESIVE VINYL CLICK HERE!
FOR ANSWERS TO FREQUENTLY ASKED QUESTIONS CLICK HERE !
TO SEE STEVE COLES' AUTOMOBILE GRAPHICS CLICK HERE